
A safe gun handling stance is a balanced, stable body position that gives you control over your firearm, manages recoil, and keeps the muzzle pointed in a safe direction at all times. The industry term for this is “shooting stance,” and it forms the foundation of every safe and accurate shot you will ever fire. Whether you are a first-time shooter or someone pursuing a Virginia CCW class, your stance determines whether you stay in control or lose it. The four pillars of safe firearm operation are grip, stance, sight alignment, and trigger squeeze. Get the stance wrong, and the other three suffer immediately.
What is a safe gun handling stance?
A safe gun handling stance is the deliberate arrangement of your feet, knees, hips, torso, and arms that allows you to fire a firearm safely, absorb recoil, and maintain muzzle control throughout the shooting process. It is not a rigid military posture. It is an athletic, functional position that keeps you stable under pressure.
The connection between stance and safety is direct. When your body is properly aligned, your muzzle naturally points toward the target and away from bystanders. When your weight is balanced, you recover faster between shots and reduce the chance of a negligent discharge caused by stumbling or losing control. Proper gun handling starts from the ground up, and every certified NRA instructor at Trouble Defense teaches this principle from the very first class.
Two stances dominate civilian and defensive firearm training: the Isosceles and the Weaver. Both are covered in depth below, but understanding what makes any stance “safe” comes first. A safe stance enforces muzzle discipline, supports trigger finger control, and keeps you physically stable enough to make deliberate decisions.
What are the essential components of a safe gun handling stance?
A balanced shooting stance places your feet shoulder-width apart, knees slightly bent, with a slight forward lean to maintain stability and manage recoil. Each element of that description does specific work. Here is what each component contributes:
- Feet positioning: Place your feet shoulder-width apart, with your dominant foot slightly back. This creates a stable base that resists the rearward push of recoil and keeps you from rocking backward.
- Knee bend: A slight bend in both knees lowers your center of gravity. Locked knees make you rigid and slow to recover. Bent knees act like shock absorbers.
- Forward lean: Lean slightly forward from the hips, not the waist. Engaging your core muscles improves recoil management and reduces muscle strain during extended shooting sessions.
- Weight distribution: Keep roughly 60 percent of your weight on your front foot. This forward bias lets you push into the recoil rather than being pushed back by it.
- Arm positioning: Extend both arms toward the target with a slight bend at the elbows. Locked elbows transfer recoil directly into your shoulders and reduce control. A slight bend absorbs it.
- Body alignment: Square your shoulders to the target. This keeps your muzzle naturally oriented toward the threat and away from anything you do not intend to shoot.
Pro Tip: The most common beginner mistake is leaning backward, not forward. If you feel like you are fighting the gun after each shot, check your weight distribution first. Shift forward and the gun will feel half as heavy.
Grip integrates directly with stance. A firm, two-handed grip with your support hand wrapping around the dominant hand fills the frame and reduces muzzle flip. Beginners who focus only on grip and ignore stance often find their shots drifting because the whole-body platform is unstable. Think of your stance as the foundation and your grip as the structure built on top of it.
How do common shooting stances compare and which fits your needs?
No single stance fits every shooter or every situation. The goal, as shooting ergonomics research confirms, is to create a stable, natural position that aligns your natural point of aim and minimizes fatigue over time.
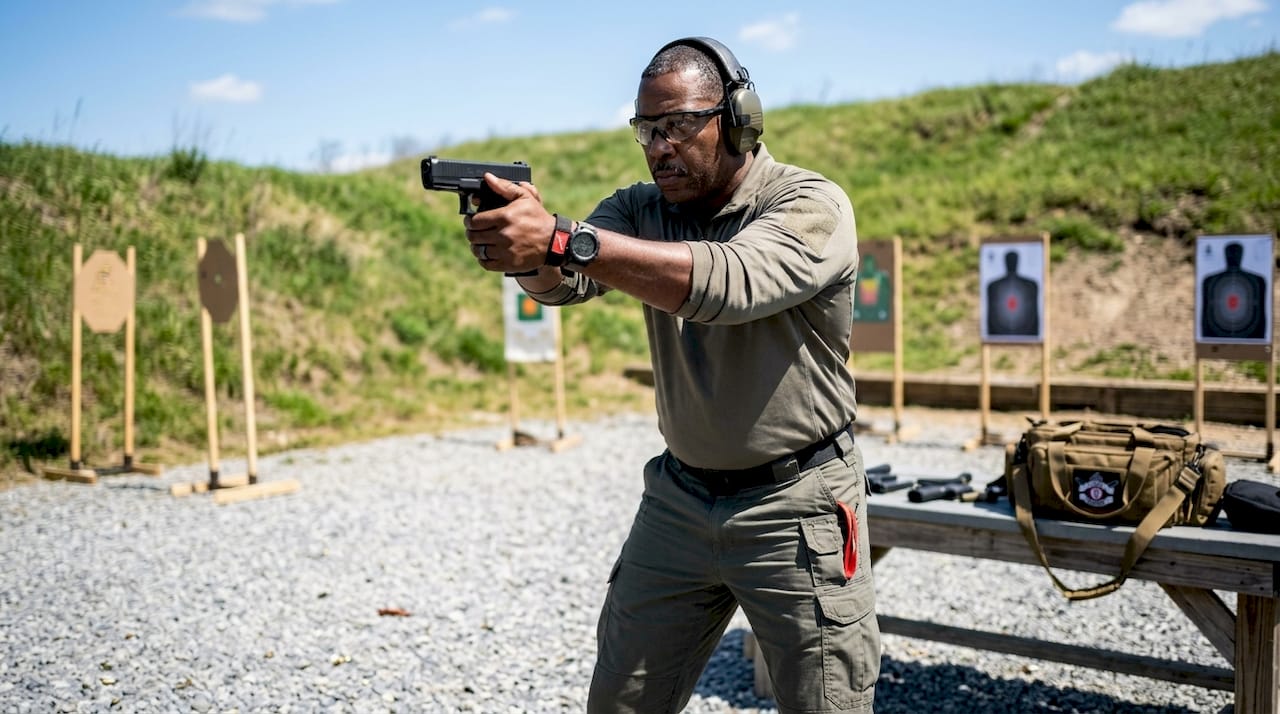
The Isosceles stance
The Isosceles stance involves standing with feet shoulder-width apart, shoulders squared to the target, and both arms extended straight, forming a triangle shape between your arms and chest. This triangle is what gives the stance its name. It is the most widely taught stance in civilian self-defense training because it is intuitive, easy to learn, and works well in low-light or high-stress situations where fine motor skills degrade. Your body naturally squares up to a threat, which is exactly what this stance requires.
The Weaver stance
The Weaver stance uses a staggered foot position with the dominant foot back and a push-pull tension between the shooting arm and the support arm. The shooting arm pushes forward while the support arm pulls back, creating isometric tension that controls muzzle rise. It offers excellent recoil control for experienced shooters but requires more practice to execute correctly under stress. Many competitive shooters and law enforcement professionals favor it for rapid follow-up shots.
Stance comparison at a glance
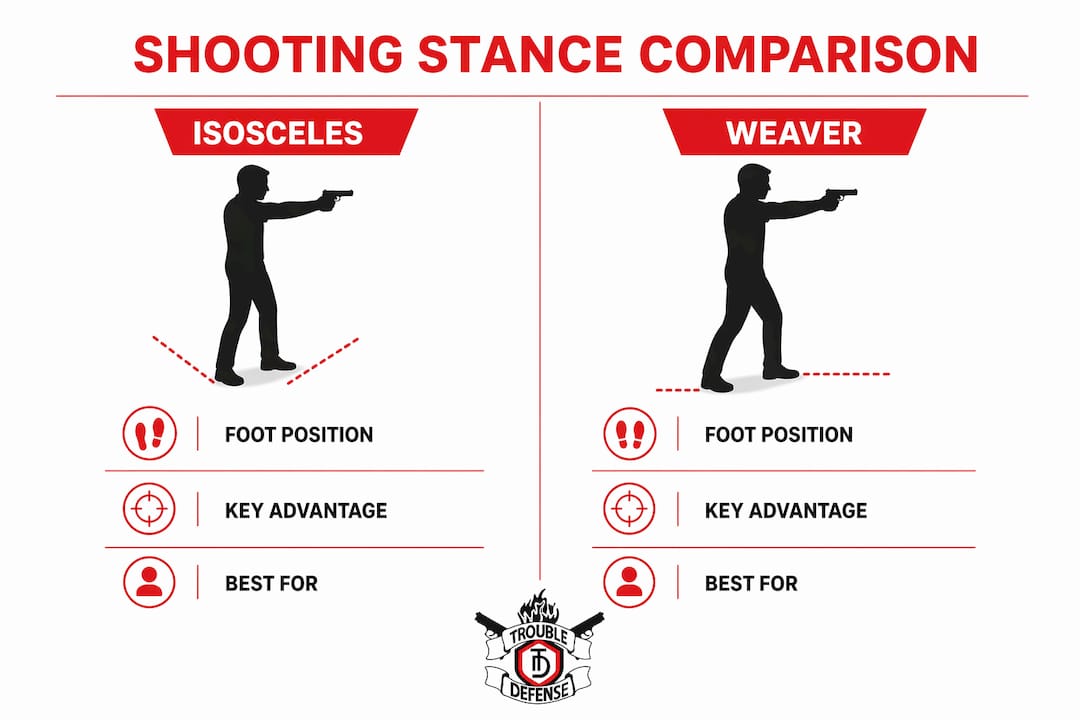
| Stance | Foot position | Key advantage | Best for |
|---|---|---|---|
| Isosceles | Shoulder-width, squared | Easy to learn, natural under stress | Beginners, defensive shooting |
| Weaver | Staggered, dominant foot back | Superior recoil control | Experienced shooters, competition |
| Modified Isosceles | Shoulder-width, slight stagger | Balances both approaches | Intermediate shooters |
| Kneeling | One or both knees down | Lower profile, cover use | Tactical scenarios |
| Sul position | Muzzle pointed down, close to body | Safe muzzle direction in crowds | Movement, close quarters |
Pro Tip: Do not pick a stance because it looks cool in a video. Stand naturally, raise your firearm with your eyes closed, then open them. Where the sights land is your natural point of aim. Build your stance around that, not around someone else’s geometry.
The Modified Isosceles is what most students at Trouble Defense settle into after a few sessions. It combines the squared shoulders of the Isosceles with a slight foot stagger borrowed from the Weaver, giving you stability without the steep learning curve. For defensive shooting scenarios, this hybrid approach holds up well under pressure.
How to practice and maintain safe gun handling stance habits effectively
Building a safe stance into muscle memory requires repetition before you ever fire a live round. Here is a structured approach that works for beginners and experienced shooters alike:
- Start with dry-fire practice. Dry-fire practice with an empty firearm is the most effective way to ingrain safety habits and correct stance without the distraction of recoil or noise. Before every dry-fire session, verify the firearm is unloaded, remove all live ammunition from the room, confirm a safe backstop, and announce that you are beginning dry fire.
- Set your stance before you raise the gun. Plant your feet, bend your knees, and lean forward before the firearm comes up. This trains your body to establish the platform first, not after.
- Check your muzzle direction at every step. During dry fire, pause at each stage of the draw and verify where the muzzle is pointing. This builds the habit of constant muzzle awareness.
- Practice trigger finger discipline separately. Keep your trigger finger straight and indexed along the frame until your sights are on target. Practice this movement hundreds of times without firing. It becomes automatic faster than most people expect.
- Record yourself. Use your phone to film your stance from the front and side. Most shooters are shocked by what they see. A forward lean that feels dramatic often looks barely noticeable on video.
- Get professional feedback early. Common beginner firearm mistakes are much easier to correct in the first few sessions than after months of reinforcing bad habits. A certified instructor catches errors you cannot see yourself.
- Progress to live fire with the same deliberate setup. Do not rush to the range and abandon your dry-fire habits. Slow down, set your stance, and fire one round at a time until the position feels natural under recoil.
Trouble Defense instructors use concise, calm correction cues during training. Single-word corrections reinforce safe habits without discouraging learners, which is why students build confidence faster in a structured class than through self-directed range time alone.
What safety rules tie directly into safe gun handling stances?
The four primary rules of gun safety are not separate from stance. They are enforced by it. Every element of a proper shooting stance exists to support at least one of these rules:
- Treat every firearm as if it is loaded. Stance begins the moment you pick up a firearm, not when you decide to shoot. A proper grip and muzzle-down orientation should be your default from the first touch.
- Never point the muzzle at anything you would not want to destroy. Your stance controls muzzle direction. A squared, forward-leaning position keeps the muzzle oriented toward the target and away from bystanders. Poor stance, especially leaning back or twisting sideways, can sweep the muzzle across people without the shooter realizing it.
- Keep your finger off the trigger until your sights are on target. Muzzle control and trigger discipline are continuous, lifelong disciplines that apply during drawing, holstering, and clearing malfunctions, not just while firing.
- Know your target and what is beyond it. Stance affects where your shots go if you miss. A stable, aligned position makes your shots predictable. An unstable stance introduces variables that send rounds in unintended directions.
“Safe gun handling habits like muzzle control and trigger finger discipline must become lifelong practices embedded in every action involving firearms.” — American Gunsmithing Institute
The redundancy principle in safe handling means that both muzzle control and trigger discipline must be active simultaneously. One without the other is not enough. Your stance is the physical structure that makes both possible at the same time. For youth firearm safety education and lifelong trigger discipline, this principle is the starting point of every lesson.
Key takeaways
A safe gun handling stance is the physical foundation that makes every firearm safety rule enforceable, and mastering it requires deliberate practice, professional feedback, and consistent application of the four primary safety rules.
| Point | Details |
|---|---|
| Stance definition | A balanced, stable body position that controls recoil and maintains safe muzzle direction. |
| Core components | Feet shoulder-width apart, knees bent, forward lean, and aligned body position toward the target. |
| Stance selection | Choose Isosceles for simplicity, Weaver for recoil control, or Modified Isosceles for a practical balance. |
| Practice method | Dry-fire practice with strict safety protocols builds muscle memory before live fire. |
| Safety rule integration | Proper stance enforces muzzle control and trigger discipline simultaneously, reducing negligent discharge risk. |
Why stance mastery changed how I teach firearm safety
I have watched hundreds of students walk into their first class gripping the gun like it owes them money, feet together, leaning back like they expect it to explode. The stance problem is almost always the first thing I correct, and fixing it changes everything else instantly. Accuracy improves. Confidence goes up. The gun stops feeling like a threat and starts feeling like a tool.
What most articles miss is that stance is not just a shooting technique. It is a safety posture. When your body is in the right position, the muzzle goes where it is supposed to go, your trigger finger stays where it belongs, and you have the physical stability to make deliberate decisions instead of reactive ones. That matters most in high-stress situations, which is exactly when stance breaks down for untrained shooters.
I also push back on the idea that there is one perfect stance. I have trained shooters with mobility limitations, shooters recovering from injuries, and shooters who simply have different body mechanics. The adaptive firearms training work we do at Trouble Defense has taught me that the principles matter more than the exact foot position. Balance, forward lean, muzzle awareness, and trigger discipline translate across every body type and every context.
My honest recommendation: do not wait until you feel “ready” to get professional instruction. The habits you build in the first ten hours of shooting are the hardest to change. Get them right from the start.
— Dee Parker
Ready to build your stance with certified instructors?
Trouble Defense offers hands-on firearm training across Virginia, Maryland, and Washington DC, with courses designed for every experience level. Whether you are starting from zero or refining skills for a concealed carry permit, the certified NRA instructors at Trouble Defense teach safe shooting positions, proper gun handling, and the four safety rules in a supportive, judgment-free environment.
Courses include Virginia CCW certification, Maryland Wear and Carry training, beginner firearm courses, women’s firearm training, and specialized adaptive programs for blind and low-vision individuals. With over 300 five-star Google reviews, Trouble Defense is the DMV area’s most trusted name in firearm safety education. Browse the full training calendar and register for the class that fits your schedule and goals.
FAQ
What is the best stance for a beginner shooter?
The Isosceles stance is the best starting point for beginners because it is intuitive, easy to replicate under stress, and naturally squares the body to the target. Most certified instructors, including those at Trouble Defense, teach it as the foundation before introducing variations.
How does stance affect firearm safety?
Stance directly controls muzzle direction and physical stability, both of which are required to follow the four primary gun safety rules. A poor stance can cause the muzzle to sweep unintended targets and reduce the shooter’s ability to maintain trigger discipline.
Can I practice my shooting stance at home without a firearm?
Yes. You can practice foot positioning, weight distribution, and forward lean without any equipment. Adding dry-fire practice with an unloaded firearm, following strict safety protocols, builds the full stance into muscle memory before you ever visit a range.
What is the difference between the Isosceles and Weaver stance?
The Isosceles stance squares both shoulders to the target with arms extended equally, while the Weaver stance staggers the feet and uses push-pull arm tension for enhanced recoil control. The Isosceles is easier to learn; the Weaver offers more control for experienced shooters firing rapidly.
Do I need a class to learn proper gun handling stance?
A class is not legally required to learn stance, but professional instruction catches errors that self-directed practice reinforces. Trouble Defense’s beginner firearm courses provide immediate, personalized feedback that accelerates safe habit formation significantly faster than range time alone.
Recommended

